Teaching Video, Part 2 -- A Lexicon of Shots
KNOWING WHICH SHOTS TO GO FOR, HOLDING YOUR SHOTS AND USING A TRIPOD
Before you start shooting, it's important to know which shots are possible, and which types of shots you should go for on any given story.
Variety
The more variety you have, the better. Eventually, you'll shoot a logical combination without even thinking of which shots you are going for, but in the beginning, it's good to follow this list, and come back with some of each category, to have many to choose from. This will allow you to sequence your shots when editing, and have enough to work with to complete a successful video story.
15 seconds
It's also a good idea to hold each shot at least 15 seconds without moving at all, and letting whatever action happens pass in front of your camera's lens.
Keep Steady
Ue a tripod which works and which keeps your camera steady whatever the conditions for #1 through #9. Have a steady and purposeful hand for shot #10.
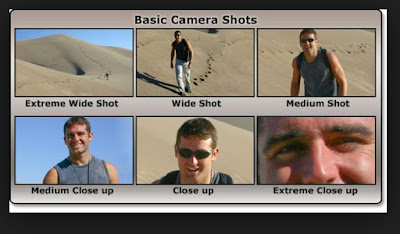
#1 -- THE EXTRA WIDE SHOT

This one is good to establish a location or a new scene within your story. Unless beautiful or really well shot, or with very good audio underneath, it can be a bit boring to start out a video piece though. Some would disagree on this point.
#2 -- THE WIDE SHOT

This is a head to toe shot of your main subject or object. It gives you focus and hones in on your subject.
#3 -- THE MEDIUM SHOT

This is a shot of half of your object, usually the top. It starts to give you more details on a person's physical details and body gestures.
#4 -- THE MEDIUM CLOSE UP SHOT

This is your standard interview shot, with the bottom of the frame passing through the midpoint of the chest, with enough room for lower thirds, where you put the subject's name and title.
#5 -- THE CLOSE UP SHOT

This is a neck and head shot of your subject. It gives you expression.
#6 -- THE EXTREME CLOSE UP SHOT

Just the eyes or the mouth of a subject for example. This is good to show emotion and detail.
#7 -- THE REACTION OR REVERSE SHOT

This one is often forgotten by beginners. Main subject can be slightly in the frame but out of focus or not centered. This can often be the most interesting shot.
#8 -- THE CUT IN SHOT

This is extra information, a detail, coming from your main subject/object, such as a sign on a statue.
#9 -- THE CUTAWAY SHOT

This is a shot of something else in the subject's environment which helps tell your story. For example, this detail above could help tell the story of a profile on a radio technician. It can be better not to include any body parts in this shot or any part of your object, to be able to really "cutaway". A lot of these types of shots can really help during editing, to void jump cuts. From wikipedia .... A jump cut is a cut in film editing in which two sequential shots of the same subject are taken from camera positions that vary only slightly. This type of edit gives the effect of jumping forwards in time.
#10 -- THE ACTION SHOT

This one is the only one where sometimes it's better not to use a tripod to follow the action. When a subject is doing a show and tell, when following a parade, when following a basketball or football game from the sidelines, when following a busy nurse inside an emergency room, these are called "handheld" and are some of the exceptions of when not to use a tripod. OTHERWISE, USE A TRIPOD AT ALL TIMES. When not using a tripod, be as close as you can be to the action, and don't zoom in.
ANGLES AND LINES OF ACTION

Even with the reverse shot, it's a good idea to respect the 180 degree rule and always remain in one half sphere to make your video sequencing seem natural. If you switch spheres, it can look like you are filming a different object or person, because they'll be facing in the other direction. But don't hesitate to play with angles .... a high angle from above is great for establishing shots ... a low angle can be interesting to make someone or something seem larger than life ... but in an interview you want to be at eye level ... if your interview subject is much taller than you are, ask them to sit down .... if they are much shorter, crouch with your camera ... There are three eyes when doing an interview, yours, the camera's and your subject's. You want all three to be at the same level.

If you enjoyed this tutorial, make sure to check out the other chapters in my video series.
Teaching Video, Part 1 -- Your Equipment and How to Use It
Teaching Video, Part 2 -- A Lexicon of Shots
Teaching Video, Part 3 -- Shot Composition and Sequencing
Teaching Video, Part 4 -- Nat Sounds and Action Shots
Teaching Video, Part 5 -- Interviews
Teaching Video, Part 6 -- Standups
Teaching Video, Part 7 -- Choosing Your Video Stories and Shooting Them Wisely
Teaching Video, Part 8 -- Ingesting Into Premiere
Teaching Video, Part 9 -- Writing Your Script
Teaching Video, Part 10 -- Editing
Teaching Video, Part 11 -- Raising Your Game


Comments
Post a Comment